Cookies & BarsNo. 4313 · The 2026 edition
How To Make a Haunted Cookie House for Halloween
Build a spooky haunted cookie house this Halloween with black cocoa dough, eerie icing, and flickering candlelight.
Our own summary of the original — the full post and photos live at thekitchn.com.
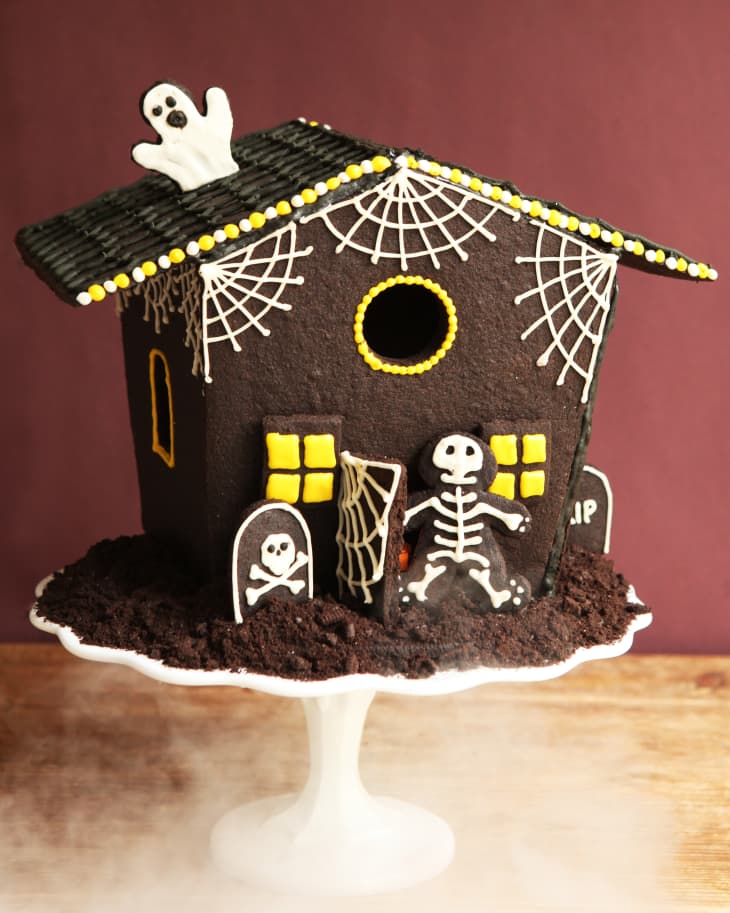
This detailed guide walks you through creating a fully assembled haunted cookie house from scratch. You'll make black cocoa gingerbread, cut and bake walls and roof, then decorate with colored icing and assemble into a standing house. Finish with a flameless tea light inside for an eerie glow.
Ingredients
Directions
- In a bowl, whisk together the all-purpose flour, black cocoa powder, Dutch-processed cocoa powder, optional espresso powder, baking powder, and salt.
- In a stand mixer or large bowl, cream the softened butter, granulated sugar, and dark brown sugar until pale and fluffy.
- Beat in the eggs one at a time, then add the vanilla extract, mixing to combine.
- Gradually add the dry ingredients to the wet, mixing just until the dough comes together. Divide into 4 equal portions and flatten each into a 1/2-inch-thick disk.
- Place each disk between two sheets of parchment paper and roll to 1/8-inch thickness. Stack rolled sheets on a baking sheet.
- Refrigerate the dough sheets for at least 1 hour. For overnight storage, wrap the baking sheet in plastic wrap.
- Print two copies each of the side wall, front/back wall, and roof templates, then cut them out.
- Preheat the oven to 350°F with racks in the top and bottom thirds. Prepare baking sheets and reuse parchment from rolling.
- Place two chilled dough sheets on a work surface, remove top parchment. Position front and back templates on dough and cut around them with a sharp knife. Remove excess dough, cut out a door and windows, and set aside. Transfer parchment with pieces to a baking sheet.
- Bake front and back pieces for about 18 minutes until very dark on edges. Meanwhile, gather scraps, re-roll between parchment, and chill.
- While still warm, trim misshapen edges or windows with a knife; save trimmings for gravel. Cool on sheet for about 20 minutes, then transfer to wire racks to cool completely.
- Repeat the cutting and baking process with the remaining two chilled dough sheets for the side walls. Cut windows if desired, bake, trim, and cool as before. Re-roll scraps and chill.
- Once the re-rolled dough is chilled, cut out two roof pieces using the templates. Bake, trim, and cool as with previous batches.
- Re-roll the last dough scraps and cut a 9-inch round base using a dinner plate or cake pan as a guide. Bake for about 20 minutes. Use remaining dough to cut small decorations (ghosts, tombstones, skeletons) and bake separately with the reserved door and window cutouts.
- For the icing, beat meringue powder and cold water until stiff peaks form (3–4 minutes). Gradually add powdered sugar (1/2 to 3/4 cup at a time) on low speed, then beat on medium-high until stiff peaks return (5–7 minutes). Adjust consistency with more sugar or water as needed; black icing should be thickest.
- Transfer 1 cup of icing to a bag (white). Mix 1 cup with yellow food coloring if desired and transfer to a bag. Stir black cocoa into the remaining icing for the black bag.
- Decorate walls and roof with white and yellow icing before assembly: add cobwebs, window frames, roof tiles, ghosts, or tombstones. Let dry for at least 1 hour.
- Set up your workspace with cookie pieces, icing bags, a serving platter or cake stand, and paper towels.
- Place the round base on the platter. Pipe a thick line of black icing for the front wall, then a perpendicular line for the left side wall (forming an L). Let sit 3–5 minutes. Pipe icing on the back of the front wall’s bottom and right edge. Stand the front wall in the first line, then the side wall in the perpendicular line, tucking it behind the front. Hold 10 minutes. Add extra icing inside the base and corner for reinforcement.
- Pipe another L of icing for the right side and back walls. Ice the inside edge of the front wall for the right side piece. Stand the right side wall in its line, tucking behind the front. Pipe icing on the back piece’s sides, stand it in the base line, and attach. Hold 10 minutes. Reinforce inside with icing. Let dry at least 30 minutes.
- If using a light, place a flameless tea light inside now. Pipe three lines of icing on the back of one roof piece (the edges contacting walls). Gently place on house, hold 10 minutes. Repeat with second roof piece, ensuring they meet at top. Pipe icing along the seam between the two roof pieces.
- Let the house dry completely for at least 12 hours or up to 2 days. Store leftover icing bags in an airtight container.
- Add final decorations: secure tombstones with icing, sprinkle cookie gravel, create a walkway, or use icing and black sprinkles as desired.