Candies & ChocolatesNo. 6452 · The 2026 edition
Halloween cakesicles
Turn a simple cake into spooky Halloween treats with these fun and customizable cakesicles!
Our own summary of the original — the full post and photos live at keep-calm-and-eat-ice-cream.com.
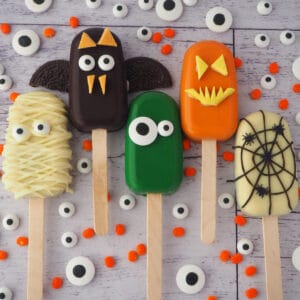
These Halloween cakesicles start with a chocolate shell and a soft cake-frosting center. Decorate them as mummies, jack-o-lanterns, monsters, bats, or spiders using candy eyes, Oreos, and melted chocolate. A creative and delicious project for your Halloween celebration.
Ingredients
Directions
- Place the chocolate in a microwave-safe bowl and heat in 30-second intervals until fully melted.
- Work quickly: spoon about 1 tablespoon of melted chocolate into each mold cavity. Swirl the mold or use a small spatula to coat the entire inside surface with chocolate.
- Continue swirling the chocolate around for a few minutes to get an even layer. Pour out any excess chocolate and scrape the top edge clean with a spatula.
- Insert the ice cream stick into the designated slot, then remove and reinsert it a couple of times to create a clear opening for it.
- Place the molds in the refrigerator for about 10 minutes to let the chocolate harden.
- If desired, use a small spoon to apply a second layer of chocolate around the edges. Refrigerate again until set before proceeding.
- Crumble the cake into fine crumbs using a food processor (just a few seconds) or by hand. Add 1–2 tablespoons of frosting and mix well. The mixture should hold together like cookie dough; if too dry, add more frosting a little at a time, mixing thoroughly after each addition.
- Take the molds out of the fridge. Press a small amount of cake mixture into the bottom of each mold, staying below the stick line. Insert the sticks, then add a tiny dollop of melted chocolate where the stick meets the mold interior. Let it set for 1–2 minutes. Fill the rest of the cavity with cake mixture, being careful not to overfill.
- Cover the top with extra melted chocolate to seal the cakesicle, then scrape off any excess. Return the molds to the fridge for at least 30 minutes to fully set.
- Gently remove the cakesicles from the molds.
- For mummy cakesicles: melt white chocolate and stir until smooth. Transfer it to a disposable piping bag or a small zip-lock bag.
- Snip a tiny corner off the bag. Drizzle several lines of chocolate back and forth over the cakesicle.
- Press two candy eyes onto the chocolate. Continue drizzling more lines over the top, including a few that go over the edges of the eyes so they look like they're peeking through bandages.
- Let the chocolate set completely.
- For jack-o-lantern cakesicles: use a sharp knife to cut the soft candy into a thin square. Cut the square diagonally to make two triangles. Cut one triangle in half again to get two smaller triangles (these become eyes).
- On the remaining triangle, cut a zigzag pattern along the long edge to create a toothy mouth. Trim the tip off the opposite side to give the mouth a flat bottom.
- Use melted chocolate to attach the eyes and the toothy mouth to the cakesicle.
- For monster cakesicles: cut candy into thin strips for mouths or eyebrows. Apply small dots of melted chocolate to the backs of candy eyes and shapes, then stick them onto the cakesicle.
- For bat cakesicles: use a sharp knife to cut Oreos in half, then scrape off the cream filling.
- Position two Oreo halves as wings. Use a cakesicle to test the placement so the Oreos form symmetrical wings. Make sure the cakesicle will balance on the Oreo pieces.
- Put a blob of melted chocolate on each corner of the Oreo that will be covered by the cakesicle, then place the cakesicle on top.
- Use a sharp knife to cut bat ears and fangs from the soft candy. Slice the candy into thin square slabs.
- Cut a small square. Make a point at the top center of the square, then cut lines down to the two bottom corners. Repeat with another square. The larger triangles become ears; the smaller ones become fangs.
- Use small dabs of melted dark chocolate to attach the ears, candy eyes, and fangs to the front of the cakesicle. Let everything set completely before handling.
- The Oreo wings are fragile and can break easily, so take care when storing or moving the bat cakesicles.
- For spider cakesicles: melt dark chocolate and stir until smooth. Transfer it to a disposable piping bag or small zip-lock bag, then snip a tiny corner.
- Pipe an X across the cakesicle, making the first line go all the way across, then the second line. Add a vertical line down the center, then a sideways X, so you have about five long lines in total.
- Carefully pipe two circles over the lines. Immediately press candy spiders onto the chocolate.