Cakes & CupcakesNo. 8505 · The 2026 edition
Halloween cakesicles
Create spooky Halloween cakesicles with ghoulish candy faces, Oreo wings, and creepy spider webs!
Our own summary of the original by Sarah Brooks — the full post and photos live at keep-calm-and-eat-ice-cream.com.
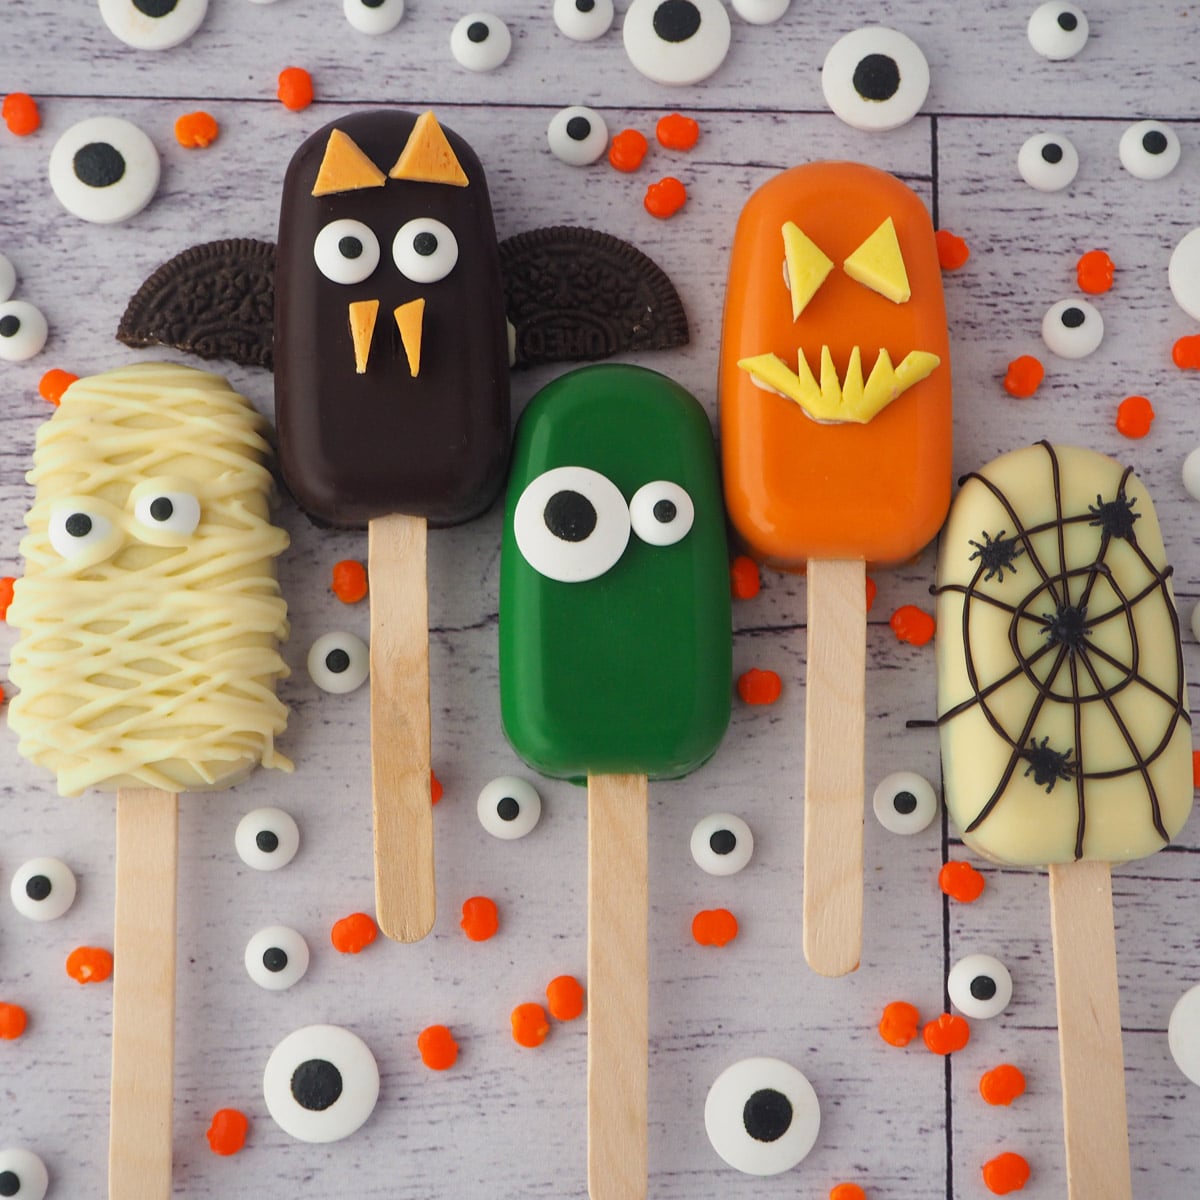
These Halloween cakesicles feature a chocolate-coated cake pop with a creamy center, decorated as mummies, bats, and spiders. You'll use melted chocolate to form the shell, then customize with candy eyes, Oreo wings, and intricate candy cutouts. Perfect for a frightfully fun treat.
Ingredients
Directions
- Melt the chocolate or candy melts in a microwave-safe bowl, heating in 30-second intervals and stirring between each until fully melted.
- Work swiftly to add about 1 tablespoon of melted chocolate to each mold cavity. Use a small spatula or gently tilt the mold to coat the entire interior surface with chocolate.
- Continue swirling the chocolate around the molds for a few minutes to ensure an even coating. Pour out the excess chocolate and scrape off any extra with a spatula.
- Insert the ice cream stick into the designated hole and remove it a couple of times to create a clear opening for the stick.
- Place the molds in the refrigerator for about 10 minutes to allow the chocolate to set.
- Optionally, add a second layer of chocolate along the edges using a small spoon. Let it set again before proceeding.
- Crumble the cake into fine crumbs using a food processor (a few seconds) or by hand. Mix in 1–2 tablespoons of frosting initially, then add more gradually while mixing until the mixture holds together like cookie dough.
- Take the set molds out of the fridge. Press a small amount of the cake mixture into the bottom of each mold, staying below the stick hole line. Insert the sticks and add a small dollop of melted chocolate where the stick meets the mold interior. Let it set for 1–2 minutes, then fill the remaining space with cake mix, leaving room for a chocolate seal on top.
- Cover the top with additional melted chocolate to seal the cakesicles, scraping off any excess. Return to the fridge to set for at least 30 minutes.
- Carefully remove the cakesicles from the molds.
- Melt the white chocolate and stir until smooth. Transfer to a disposable piping bag or a small zip-top bag.
- Snip a small corner off the bag. Drizzle several lines of white chocolate back and forth across the cakesicle.
- Place two candy eyes onto the chocolate drizzle, then continue drizzling more lines over and around the eyes so they appear to be peeking through bandages.
- Allow the chocolate to set completely.
- Using a sharp knife, cut the soft candy into a thin square. Then cut the square diagonally to form two triangles. Take one triangle and cut it in half again to get two small triangles (the eyes).
- On the remaining large triangle, cut a tooth pattern along the long side for the mouth. Trim the tip off the opposite side to create a flat bottom for the mouth.
- Use melted chocolate to attach the candy eyes and the toothy mouth to the cakesicle.
- Cut thin lines from candy for eyebrows or additional mouth details. Secure them with small blobs of melted chocolate to the cakesicle.
- Cut the Oreos in half with a sharp knife and scrape off the white cream filling.
- Position two Oreo halves to form wings. Use the cakesicle to check placement so it will balance on the Oreo pieces.
- Put a blob of melted chocolate on each corner of the Oreos that will be covered by the cakesicle, then set the cakesicle on top.
- Cut the soft candy into thin square slices to make bat ears and fangs.
- For the tops of the triangles, make a point in the center of a square, then cut lines down to each corner. Repeat with another square. Larger triangles become ears; smaller ones become fangs.
- Use dark melted chocolate to stick the ears, candy eyes, and fangs onto the front of the cakesicle. Allow to set completely before handling.
- The Oreo wings are fragile and may break, so take care when storing and moving the finished cakesicles.
- Melt the dark chocolate and stir until smooth. Place it in a disposable piping bag or small zip-top bag, then snip a small corner.
- Drizzle an X pattern across the cakesicle, making one line go all the way across, then the next line, and so on.
- Draw a line down the center, then a sideways X, creating about five long lines total. Carefully drizzle two circles over the lines, then immediately stick on candy spiders.
Per serving
- 4.0 fat g
- 23.0 carbs g
- 18.0 sugar g
- 132.0 calories
- 1.0 protein g