Cakes & CupcakesNo. 5191 · The 2026 edition
How To Make a Spider Cake
Create a show-stopping spider cake with a domed body, fondant eyes, and straw-supported legs for a spooky Halloween centerpiece.
Our own summary of the original — the full post and photos live at ilovecooking.ie.

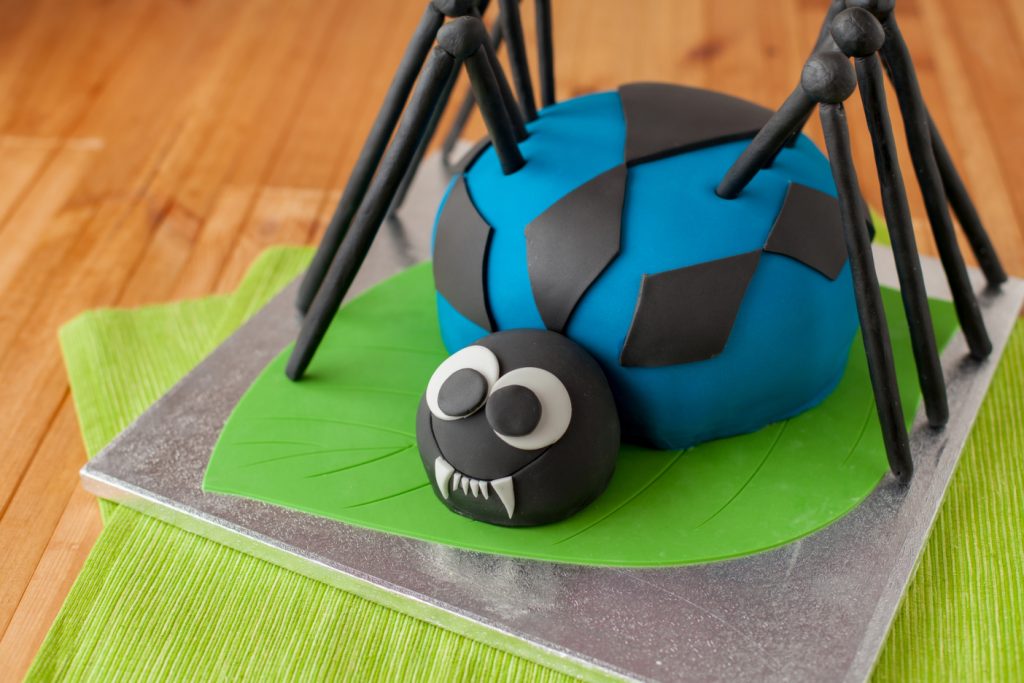
This spider cake recipe guides you through baking a tall, moist cake and carving it into a spider shape. You'll cover the body in blue fondant and the head in black, then add white eyes, fangs, diamonds, and straw-based legs. With a green fondant leaf base, it's a creepy-crawly treat perfect for Halloween.
Ingredients
Directions
- Start by setting your oven to 160°C (325°F, gas mark 3). Grease a 20cm (8-inch) springform cake tin, then line the base and sides with baking paper, making sure the paper extends about 5cm (2 inches) above the rim to create a collar for a tall cake. Place a large ovenproof dish filled with water on the lowest oven shelf to add moisture during baking.
- Also, grease and flour a small ramekin or similar ovenproof dish; this will form the spider’s head.
- In a large bowl, use an electric mixer to cream the 450g softened butter and 450g caster sugar together until pale and fluffy—this will take 5 to 10 minutes.
- In a separate bowl, sift together the 450g self-raising flour, 235g plain flour, and 1 teaspoon salt; set aside.
- Beat the eggs into the butter mixture one at a time, adding 1 tablespoon of the flour mixture with each egg. Scrape down the bowl sides between additions. Then mix in the 1 tablespoon vanilla extract.
- Add the remaining flour mixture and beat on the lowest speed just until combined—do not overmix.
- Spoon the batter into the prepared ramekin nearly to the top. Put the rest into the prepared springform tin and smooth the top with a spatula. Bake both: the cake for 1½ hours, but remove the ramekin after 25–30 minutes. Check doneness by inserting a skewer; it should come out clean. If not, bake in 10-minute increments until done.
- Remove from the oven and let the cake cool in the tin on a wire rack.
- When completely cool, take the cake out of the tin, wrap tightly in clingfilm, and place in an airtight container. For best results, let it rest overnight so it firms up for carving.
- For the buttercream, beat the 115g softened butter in a large bowl until smooth. Sift in the 250g icing sugar, then add 2 tablespoons milk, 1 teaspoon vanilla, and ½ teaspoon salt. Mix on low until incorporated, then increase speed and beat until creamy and smooth, scraping down the bowl as needed.
- The buttercream can be made ahead and stored in the fridge overnight. Before using, let it sit at room temperature for 1–2 hours and give it a quick stir.
- Optional: Prepare a large cake board or serving plate. Knead the green fondant on a cornflour-dusted surface until soft, then roll it out into a large rectangle. Cut a leaf shape with a sharp knife or pizza cutter.
- Carefully transfer the leaf to the board. Use a blunt tool to mark veins, pressing lightly without cutting through. Ideally, make the leaf a day ahead so it dries and becomes firmer.
- Slice the large cake horizontally in half. Spread about one-third of the buttercream over the bottom half, then place the top half back on and press gently. Use a serrated knife to trim the top edges all around, forming a dome shape. Carve the small cake (the ramekin cake) into a ball with a flat base for the head. Cover both head and body with a thin layer of buttercream and set aside.
- Dust a work surface with cornflour. Knead about a quarter of the black fondant until pliable (wear gloves to avoid stickiness). Roll it out into a circle large enough to cover the head cake. Place the rolled icing over the head, smooth it down to the base, and trim excess with a sharp knife. Save clean trimmings. Then knead the blue fondant and roll it out on a larger dusted surface into a circle 45–50cm (18–20 inches) wide and 3–5mm (⅛–¼ inch) thick. Roll it onto your rolling pin, then unroll it over the large cake, centering it. Smooth over the top and sides, trim excess leaving a small border, then trim flush to the base.
- To decorate: Knead and roll out white fondant, cut two circles for eyes, and cut small fangs/teeth. Roll out black fondant, cut two small circles for pupils. Re-knead black fondant and cut diamond shapes. Set aside. For legs: have 12 straws ready; cut 4 in half. Roll black fondant into thin sausages. Lightly wet a full-length straw, press into the icing, close around it, and roll smooth. Trim icing so the straw sticks out at one end and the other is covered. Repeat with half-length straws, leaving straw exposed at both ends. Repeat for all straws. Then roll small icing balls, use them to attach a long and a short straw together (moisten contact points). Set legs aside.
- Use a blunt tool to gently impress a smile on the head (don’t cut through icing). Glue the white eye circles onto the head by dampening the back with water. Then glue the black pupils onto the white eyes. Attach teeth/fangs the same way. Stick the black diamonds onto the spider’s body using a little water. Carefully lift the body with a large spatula and position it on the prepared board. Place the head against the body. For extra security, join them with a toothpick. Finally, gently stick the legs along the sides of the body.
More photos

Photos hosted by ilovecooking.ie.