Cakes & CupcakesNo. 3417 · The 2026 edition
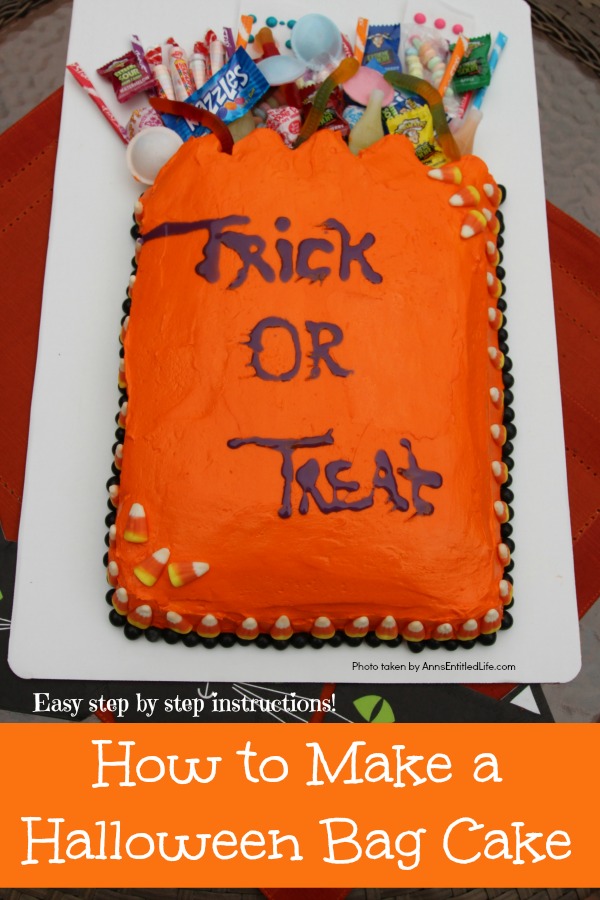
How to Make a Halloween Bag Cake
Our own summary of the original — the full post and photos live at annsentitledlife.com.
Ingredients
Directions
- Cut off one end of the cake in a zigzag. These cuts are about an inch deep. Go as deep or as shallow as you like, but space them out, so they look fairly uniform.
- Put down a bit of frosting in several places on your 13″x9″ board. This will “cement” the cake in place. (Keep in mind you are placing the uncut end of your cake toward the bottom of your board.)
- Turn your cake onto your 13″x9″ board. Make certain the uncut part of the cake is toward the bottom of your board leaving plenty of room at the top to insert candy.
- Load up a pastry bag with orange frosting. No tip is needed.
- Start to pipe the orange frosting over the cake. DO NOT frost the ends of the cut jagged part!!
- The frosting is VERY thickly applied. You want that. If you make a mistake, do not like what you wrote, you can scrap lightly, fill in with a squirt of frosting, smooth, and re-write. No one will ever know you made a mistake.
- Using a frosting knife spread out the piped frosting.
- Fill a glass with enough cold water that you can dip your frosting knife into it. Dip your frosting knife in the cold water, and run the frosting knife over your spread frosting. The cold water will help smooth out any bumps and ridges. Lift the frosting knife when it no longer is smoothing, and dip in the cold water again. If at any time you come away with orange frosting on your frosting knife, wipe it off with a paper towel or rag before dipping the frosting knife into the cold water again. Do not worry too much about the sides, they will be covered with candy.
- Place a row of small chocolate round (or flat) candies at the base of the frosted bag before you frosting sets.
- Place candy corn straight up all along the side before the frosting sets. This will square-off the cake and hide major side imperfections.
- Place a few candy corns at the corners of your bag.
- Write trick-or-treat, boo!, Happy Halloween, or some other Halloween-related greeting on the top of your cake. The food writer icing does not have to be perfect for a Halloween cake!!
- Start by placing tall candy at the top of your cake. They can be stuck into the top of the cake, or simply laid on the board.
- You are creating a 3-D effect, so keep that in mind.
- You can unwrap your candy as you add it, or keep the plastic wrapped packaged intact (remember, no paper as if the frosting touches it, the frosting will bleed onto paper).
- You can tack-down any large or lose candy to the board. Remember that children may (will) pull candy from the cake, so keep the frosting-cementing to a minimum.
- When you have finished, allow the cake to dry before boxing (if you are taking it somewhere).
- That is it! All together this took an hour to do, and that included baking the cake – which is the longest part! Do work with a cool cake though as you do not want the frosting to melt on a warm/hot baked cake.