Painted PumpkinsNo. 5278 · The 2026 edition
Spiderman Pumpkin (No Carve Version)
Turn a plain Styrofoam pumpkin into Spiderman with this no-carve craft that uses paint and a marker.
Our own summary of the original — the full post and photos live at funmoneymom.com.
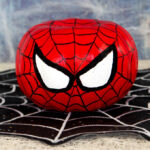
This no-carve Spiderman pumpkin project uses a Styrofoam pumpkin, red, white, and black paints, and a black marker. Start by painting the pumpkin red, then draw and fill in the eyes, and finally create the iconic web pattern with a marker. It's a simple, mess‑free way to make a superhero decoration.
You'll need
Directions
- Apply red acrylic paint to the Styrofoam pumpkin. For full coverage, put on two or three layers, letting each coat dry for roughly twenty minutes before applying the next one.
- Sketch the eye shapes. It's best to outline them lightly with a pencil first—using a marker directly can lead to errors that need covering up. Once the outlines are set, fill the interior of each eye with white paint.
- Paint the area around the white eye centers with black acrylic paint to complete the eye design.
- After the black paint dries completely, use a black marker to begin drawing Spiderman's web pattern on the front of the pumpkin.
- Extend additional lines toward the back of the pumpkin, and join them with shorter connecting lines.
- Continue expanding the web pattern until it reaches the very back of the pumpkin. Then you're done—a superhero pumpkin ready for display!
More photos


Photos hosted by funmoneymom.com.





